i should be mopping the floor: paint
Homepage Projects and Crafts Free Fonts Free Printables and SVG Files Printables Journals and Planners Facebook Covers and Device Wallpapers Get Organized


Showing posts with label paint. Show all posts

Ethan Allen Console Table Makeover

This Ethan Allen Console Makeover post contains affiliate links. As an Amazon Affiliate, I make a small portion when these links are used, at no additional cost to you.

In honor of Mother's Day this weekend, I gave my mother's 1980's Ethan Allen Console Table a little makeover. I remember going to the showroom to select this table with her when I was a little kid. It brings me a lot of joy to have it back out and being used again. See how I made it over, as well as restyled it, below.

Oh, and it's Thrifty Style Team Day! This Ethan Allen Console makeover is just one of several fun and thrifty ideas listed out below.

Ethan Allen Console
While my mom would probably think my hot pink direction for this table is a bit questionable, at best, I do think she'd love the fact that we're using it again. Honestly, in the end, she always did enjoy my "wild ideas", even if they were a bit out of her comfort zone. See how this table started out, below.

Unicorn Hoop Art

This post for Unicorn Hoop Art contains affiliate links. I make a small portion when these links are used, at no additional cost to you.

Who doesn't love a glittery unicorn, y'all? This sweet little Unicorn Hoop Art project is perfect for kids and adults, alike. It combines a bit of embroidery (only one simple stitch) with fabric paint and a stencil. And of course, bonus points for using glittery fabric paint on your unicorn.

Whip up these Unicorn Hoop Art Pieces in No Time!
Where are my unicorn lovers out there? This sweet little project is so fun to put together...especially with the combination of fabric paint and embroidery. You can totally do one or the other...but combining the two really makes your unicorn POP! I also used an adhesive stencil to make the painting really simple. See how this glittery unicorn hoop art came together below.

Easy Pickling Paint Finish

This post for Pickling Paint contains affiliate links. As an Amazon Affiliate, I make a small percentage when these links are used, at no additional cost to you.

This Easy Pickling Paint Finish eliminates a lot of the steps from the traditional pickling finish...and looks just as beautiful (well, in my opinion, I suppose). I'm sharing below how I made over this 1990s garage sale find into a lovely little craft table using a pickling paint.

Easy Pickle Wash Finish | Achieve a soft white washed finish with these two simple steps.
Not only am I sharing all of the ins and outs of this pickling paint, but today is also Thrifty Style Team day. Our group of thrifters is really rockin' and rollin' on the vintage fun! All of their goodies are linked at the bottom of this post.

How to Paint a Buffalo Check Pattern

Today's Tutorial for a Buffalo Check Pattern is sponsored by Plaid Crafts and contains affiliate links. I make a small portion when these links are used, at no additional cost to you.

These Buffalo Check Wooden Letters are the first of a few projects I'm working on for my boys' bathroom overhaul. I think they are perfect to distinguish whose towel hangs where (notice there is definitely not a letter to indicate anyone's towel should be wadded up on the floor...Jonathan, I'm talking to you). 
See how I created the Buffalo Check Pattern below.

Easy Buffalo Check Painting
This tutorial has been the craziest one to put together. I've had the letters finished for a bit, but got a wild hair to go ahead and start on the actual re-do of the boys' bathroom (and ripped out wallpaper and popcorn ceilings in the process) so I could really show these fun letters off. It was an interesting chain of events. But, yay for this wall being done (we still have a *bit* more to do everywhere else in this space). But check out the tutorial for how to paint a buffalo check pattern on these wooden letters below.


Tin Can Flower Garden

This post for a Tin Can Flower Garden contains affiliate links. I make a small portion when these links are used, at no additional cost to you.

Our chain link fence got a little makeover with a simple tin can flower garden. We had enough cans leftover that we used a few for a centerpiece down our patio table, too. I think any place is a good place for a sweet little tin can flower garden, actually!
Tin Can Flower Garden
Do you have a chain link fence that could use a little spruce up? We have vine growing on the majority of our fence, but it was a bit untidy where the vine tapered off. We fixed that with the sweetest little tin can flower garden that the whole family worked on together. See how simple it was to create below.


2x4 Bunnies

This tutorial for 2x4 Bunnies contains affiliate links. I make a small portion when these links are used, at no additional cost to you. Paint for the 2x4 Bunnies was provided by Plaid Crafts.

These 2x4 Bunnies are a fun little Easter craft to bring a little spring to your decor. You might even have everything you need on hand...we used a 2x4 from our scrap pile for this project. And these 2x4 bunnies seem to multiply like, well...you know.
Bunny Blocks
I love a good 2x4 project...mainly because I have loads of leftover 2x4s on hand from various projects. Usually, these projects don't cost a thing to put together...and are fairly uncomplicated, too. Check out my complete tutorial for these 2x4 Bunnies below.

DIY Ring Toss Game

This Ring Toss Game post contains affiliate links. I make a small portion when these links are used, at no additional cost to you.

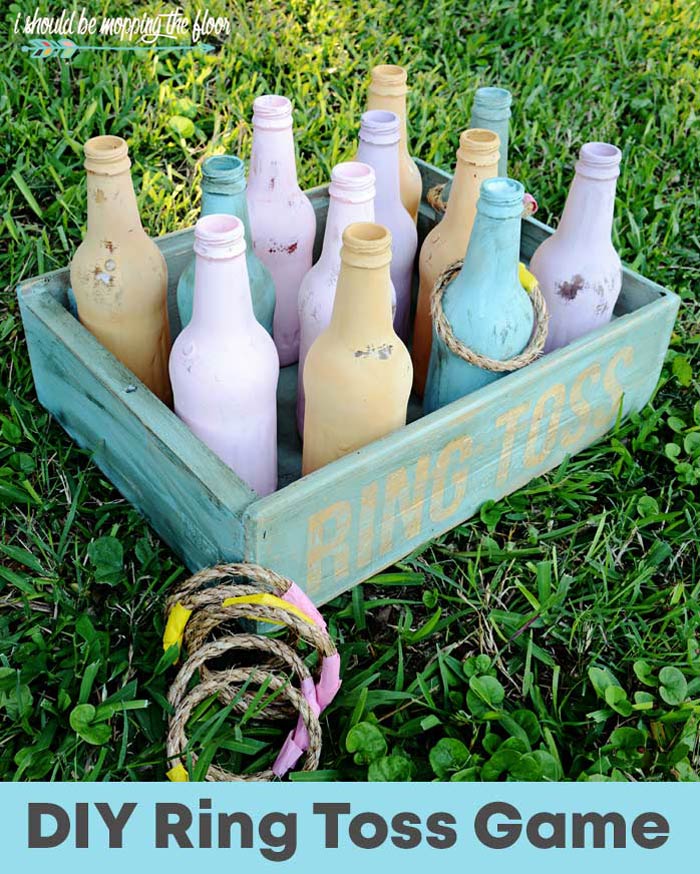
This fun and colorful DIY Ring Toss Game is easy to put together. It's practically guaranteed to create endless fun for summertime parties, backyard entertaining, picnics, tailgating, and just everyday boredom busters for the kids (who doesn't love ring toss, right?). See how we made our own ring toss set below. 

Ring Toss Game


It's the season of backyard play and outdoor get togethers, y'all! We just had our first summer par-tay this past weekend...and our new DIY Ring Toss set was put to good use. This is such an easy backyard game, both to make and to play. Check out how we put a fun shabby-chic vibe on this simple craft below.

Chest of Drawers Makeover and Tutorial

This Chest of Drawers Makeover and Tutorial contains affiliate links. I make a small portion when these links are used, at no additional cost to you.

This piece belonged to my maternal great grandmother.
If you follow this blog regularly, you've probably come to the conclusion that she had an extensive amount of wooden furniture...a woman after my own heart! See how I made over this Chest of Drawers below.

So, this fun piece showed up at my house via one of my brothers about a year and a half ago. My house is where many family furniture pieces come to their final resting place...and then I do my best to resurrect them. And then keep them for myself...forever (twirls fictitious evil mustache).

14 Awesome Furniture Refinishing Projects and Ideas

It's the perfect time of year to stumble onto some awesome garage sale pieces and do a bit of furniture refinishing. Yesterday's party was chocked full of awesome ideas and projects to get you started.
Awesome & Do-Able Ideas for Furniture Refinishing Projects


{Click through for all the project goodness}>>>

Salt and Pepper Shakers Makeover #upcycle

Thanks to Goodwill, I got a new set of salt and pepper shakers for a little over $2. With a can of paint and a little love, I'm excited to have these cuties on my dinner table now. Super easy upcycle.

I'll start out by letting you know that our old set of S&P shakers were from my college years. And I was in college in the nineties. So...it was time. Plus, every time you actually shook the old shakers, a little bit of their metallic finish came off as well...right into our food. Yum.


Both pieces for $1.99. Woot, woot! They actually had about five sets of these. Kind of kicking myself for not scooping up all of them. How cute would these {the finished version} have been down my table at a dinner party? Darn it.

I bought this Rustoleum paint since it had primer already in it. Two birds. One stone.

Spray painting in a box is the easiest way to keep the ground {and your car} free from overspray.

After they were completely dry, I brought them into my craft room, errr, messy office, to polka. Dot, that is. I don't really have an actual craft room/space. I craft right here at my desk. If I could actually get my rear in gear and organize this entire room that my family graciously gave me to use entirely by myself for work, I may put together a fun craft space {in my head, I've designed it like five times, repainted twice and moved the furniture a dozen times. It's all good}. But, that is a few projects down the list...or maybe even on page two. I digress. 

Polka dots...
I brought out the fancy tools for this. You know, the end of a new pencil eraser. It was your basic dip into a puddle of paint and dot onto the surface technique. Zero skill actually required here.  

Then I brought them back out to the box to seal with this Valspar sealer {leftover from the ORB projects}

Ready to shake it up, baby. 


Neglect your chores like me and don't miss a thing:


Fireplace Makeover {in a day!}

 
Since we bought this house almost six years ago, I've told my husband that one day he would come home from work and the fireplace would be painted white. Last week...that really happened. He came in about seven that evening as I was pulling paint tape off the floor. And {thankfully}, he loved it. 
Whew.

The thing about painting brick {and I know there's lots of people against painted brick...including my parents who aren't even a little bit shy about sharing their opinion on it}...is that it's pretty much permanent. Unless you feel like sandblasting. Which I don't.

No turning back now!
I had chatted with my Sherwin Williams' guys a floppity-jillion times about painting my fireplace. It was getting to where my family wouldn't go into SW with me anymore since I always turned the conversation to the fireplace. And truthfully, there couldn't be a more simple project. SIMPLE.

Since our house was built within the last ten years, all of the "working parts" of the fireplace are actually contained within the fire box area. Because of this, I didn't even have to use heat tolerant paint. I used plain white semi-gloss latex paint {it was actually leftover paint...even better. This was literally a no-cost project}. If you have an older fireplace with vents and all that, you may need to chat with your paint store about what to use...there's rules for all the different fireplace ages {apparently}.

It did take three coats, probably about a gallon's worth of paint total. Brick is super porous and just soaks up paint like crazy...especially in the mortar. I used a very nappy roller so it could get into all of the nooks and crannies with the paint.

I started out with a foam brush for the mortar...which was ri-donk-ulous {and not in a good way}. It was ripped to shreds in a moment.
{This photo is after two coats of paint}.

Then I switched to my trusty 2" angled brush. Much easier to work with. I ended up doing the entire third coat with just the brush...I kind of liked the brush strokes so I just went with it.

Ta-da!
So much fresher and clean looking. I'm really happy with how it turned out.

This whole fiasco started with these adorable little cardinals I bought {as a bday present to myself...I'm not alone in this tradition, right?}. They reminded me of my late grandma who adored cardinals {and I adored her}, so I had to have them. I wanted to put them out for Valentine's day. They didn't seem to pop too well against the old brick, though. So out came the paint and I ended up doing a random fireplace makeover in a day. My family lives in constant transition...I hope this makes for well-rounded, easy-to-adapt-to-change kids. Or maybe lots of therapy later on. It's a toss up.

I also created a simple Valentine's banner for the new fireplace as well.
It's available for free downloading here.

The Valentine's stuff is pretty simple...but I really like how it looks against the new white.

And I love how the white looks against our floors.

Okay, I take back the no-cost project part...
I was out $2 for this Goodwill birdcage that I stumbled on the other day.

It took a can of spray paint and was ready for my hearth!

Really enjoying our "new" addition to the living room!

{i linky-party here}


Dining Room Makeover {On a Budget}

 
My six-month dining room makeover was complete two days after Thanksgiving. 
Oh the irony.

It was still very usable and worked out great for Turkey Day...I just happened to stumble onto the six most delicious Craigslist chairs the Saturday following the "big" day {and by stumbled onto, I mean I've been stalking four separate Craigslist city lists for them for the entiresix months}. Their purchase brought the never-ending dining room makeover to a close and within budget thanks to my good money management. Amen and hallelujah.

And truthfully, the dining room wasn't even on my makeover list for this year...it sort of just "happened". You may remember the saga from June...

"If you give Kristi new floors, she'll want to paint the walls before they're installed. And if she decides to paint the walls, she'll want to paint stripes. And if she's repainting the walls with stripes, she'll want to redo the window treatments. And if she's redoing the window treatments, she'll want to paint the backs of the hutches blue to match the new window treatments. . ."

I've said it before, but the previous decor was quickly turning into Sunday dinner at Grandma's. And I am more of a Saturday Night Supper Club kind of gal {at least that's how I picture myself in my mind...I suppose technically more of an on-the-couch-sweatpants-wearin'-watching-Downton-Abbey-with-a-diet-soda-in-one-hand-and-laptop-in-the-other kind of gal. Potato-PotAHto}.


I didn't think too much of my old dining room until an older lady from church {and I mean older with all due respect} came by one day. She told me my dining room reminded her of her mother's current dining room...at the nursing home. I about died, y'all. 


So when I realized we were getting the new floors, I turned to David and told him I was going to take on redoing the dining room while we were in the process of redoing the floors. Seemed easy enough. {Insert eyeroll}


Looking back, I'm quite thrilled I was dumb enough to take on the project in the midst of the craziness of installing new floors. My stupidity resulted in something I'm actually kind of proud of. 

Buh-bye, nursing home decor.


I've done tutorials and posts over several of the projects in here over the past few months. Here's the breakdown {click on the links to see the full posts}:

The green took quite a bit of primer and paint to get rid of. The beauty of getting the new flooring was skipping the drop cloth ritual. Liberating.


Again, I have a tutorial on how we created the flawless stripes in here.
We did them on the two shorter walls to add more depth to a short & squatty room.


And next came the flooring installation. Oh, sweet Jesus, this was a crazy day.


But soooooo worth it.
Nothing like a nice new palette to work with.


These were inspired by Allison from The House of Hepworths.
These ended up being a necessity after I realized how heavy the drapes were. Gah.


Which also created a lovely blue floor in my garage. 
Funny how drop cloths don't actually absorb paint.


Blue garage floor=fun and funky custom drapes


The Nester inspired me to make my own DIY Starburst Mirror out of posterboard.


Then I poked around in my parents' shed and found a dilly of a project:
my great grandmother's dresser. 


I also pulled off the backs of the china cabinets and painted them with that Oops Blue as well. I painted the "wrong" side of them, so if I ever want to go back to the wood sides, I can just flip them back over.
These belonged to my late uncle, then to my mother, and about seven years ago, were passed on to me when my parents down-sized into their new home. My uncle did all of the leaded glass in the doors himself.


I truly wanted a new drum-shade chandelier in here...but at $500+, it just wasn't in my budget.
Maybe one day...

For now, I bought some sparkly beaded garland, in my favorite shade of blue, on our Salado trip and simply wrapped pieces of the garland on each arm of the chandelier, as well as one strand at the top.


It just adds some extra bling-a-ding-ding up there.


And of course, the night before Thanksgiving, I put together some centerpiece candles to use for our meal...which I'm really pleased with how they came out.
They started out as Dollar Tree candle holders! To see that tutorial, click here.


And the final touch....THE CHAIRS!

I've seriously been looking for Parsons' Style chairs for quite some time for this room. I wanted some that didn't have host/hostess chairs, so I could keep them just on the sides of the table. The table also belonged to my late uncle...and I LOVE the big chunky base legs it sits on. I wanted to nix those end chairs to show off her pretty legs. And I'm completely flabbergasted that I stumbled onto the perfect chairs on Craigslist. What a find! The previous owner was getting rid of them for a few minor reasons {nothing wrong with them...just not right for her home}. I was only too happy to take these off her hands for a bargain.  


I couldn't be happier with the new space. While I know the floors were a huge part of this makeover, we received those at no monetary cost to us. Which brought this makeover to less than $400 for everything...I was kind of excited about that one! Had I bought those chairs new, they would have been over $1,000 {I had been contemplating that purchase for the whole six months}. So happy I waited!!