This whole project started out of color-matching-desperation. I'm now set on incorporating the aqua blue from the $5 can of Oops paint {that I used
here and
here...and will also use on my piano} into
all of the main areas of our home.
And I seriously couldn't find the right shade of aqua blue on any panels or even fabric...
anywhere! So...I did what I normally do to get a good-looking window treatment...something crazy and bizarre and completely outside of the box. {Seriously if you follow this site regularly, you haven't seen a "normal" window treatment yet...I've got
hot-glued cafe curtains,
faux roman blinds made out of tension rods and now painted drop cloth panels. Why just walk into the store and buy a curtain when you can get wild & weird like me?}
Using painters' canvas drop cloths is certainly not a new concept in the DIY world. They work great. But actually painting the entire panel...not sure anyone else is this looloo but me {although I've seen some darling ones with painted stripes so I'm not too far gone}.
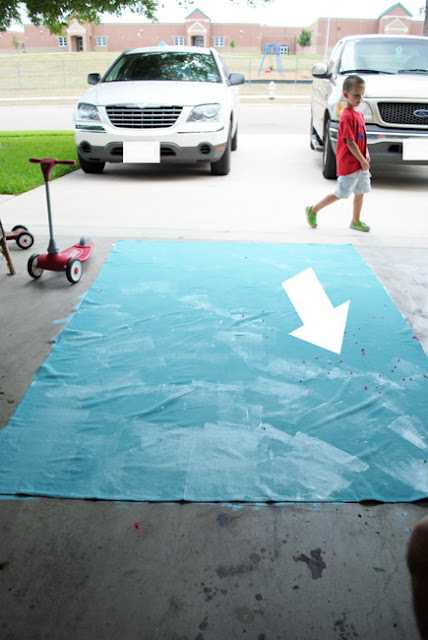
I started by laying out my 9x12 foot panel on my garage floor. I used two separate panels...a lot of people cut and hem theirs to get two. But, I don't sew {remember, I
hot glued cafe curtains?}, so I just bought two. I wanted a nice & full look anyway. I also didn't wash them...I had seen so many of you who washed their drop cloths only to suffer from major shrinkage. I did iron them...right there on the garage floor in front of God & every one. And my house is in front of the neighborhood mailbox, so lots of eyebrow raises were directed at me ironing on my garage floor.
Then I started painting. I just rolled on regular latex, semi-gloss paint {the $5 OOPS can that keeps on giving}. Before I get finger-shakes and disapproving looks, I indeed, did
not use a fabric medium incorporated into my paint. I was terrified it would alter my color that I was working so hard to maintain. I was well aware the end result would be stiff...but if you'll notice in the first photo, these drapes are not
functioning drapes. They are purely aesthetic and don't move, so the stiffness isn't a big deal to me {and yes, they are quite stiff}. But, by all means, if you are doing this to functioning drapery, please use a textile medium mixed with your paint to soften it on your fabric.
We have three enormous crepe myrtles in full bloom that kept flowering all over my drapes while I painted...I picked them up all afternoon! I ended up giving them two coats of paint per panel. And FYI...if you're a complete moron like me and just throw them down on the garage floor without anything between them & the cement, your garage floor will also be aqua blue. Is it ironic to anyone else that a
painter's drop cloth doesn't actually
absorb paint?
And of course, my fifty year old neighbor had to stop by and see what we were up to. He just doesn't
get what I do. Yet another eyebrow raise.
I let them dry for 24 hoursish. Then I hung them up...the wrong way. They were a bit long, and because of the stiffness, they didn't puddle properly. I will say that the most difficult part of this process is hanging them...they are super heavy from the weight of the paint. Thanking Jesus that
I made my own DIY drapery rods that support the weight of these bad boys {seriously didn't realize how much I
needed those rods}. The rings I used were from the previous dining room curtains...which belong at someone's grandmother's house.
I took the drapes back down and decided to fold them over from the top and then clip them....wayyyyy easier to manage this way! Then I just hung them back up.
Like I said, yes, they're stiff. But it doesn't matter to me since they're purely decorative. If you'd like softer drapes, incorporate a textile medium {available at HobLob or Michael's in the acrylic paint section} into your paint before using it.
YAY! One step closer to being done with this room and being able to have friends come over for dinner again!
On that bare wall on the left, I'm going to make a buffet with some HOT lamps on each end of it {and to be clear, I'm not talking temperature here...they're HAWT, babydoll}. I also plan to KO that chandy and DIY a new one {although when I called my mom to explain my idea for a DIY chandelier she started laughing and told me to go buy one already made...doesn't she know that just adds fuel to my fire?}
To break down the cost of this project, if you saw the post regarding the DIY rods, they were less than $4 to make...each. Each panel cost me $9.90 plus the can of $5 Oops paint, which I finally used the rest of {but I did get another can mixed for my piano!}. {I had the clips leftover from the previous drapes}. So...less than $30 for two {custom colored} panels and hardware. If I ordered these from Pottery Barn, I would have spent hundreds...I know this only because I wasn't so DIY-ish in my previous home. And I was dumb and left those gorgeous drapes behind...gets me annoyed every time I think about it.
Again, to see how to make those DIY rods holding up these puppies,
click here. It also explains why I used two demi-rods instead of one long rod across my entire window.
Thanks bunches for stopping by. Happy Drop Cloth Drapery Painting to you and yours.
 I party here:


