i should be mopping the floor: dining room
Homepage Projects and Crafts Free Fonts Free Printables and SVG Files Printables Journals and Planners Facebook Covers and Device Wallpapers Get Organized


Showing posts with label dining room. Show all posts

Thrifted Blue and White Planter Decor

This Blue and White Planter Decor post contains affiliate links. I make a small portion when these links are used, at no additional cost to you.

It's Thrifty Style Team Day, y'all. I'm sharing my Thrifted Blue and White Planter Decor that I just added to our dining room. If you love a good blue and white planter, check out my finds below.
blue ceramic planter
Man, I love a nice, ceramic blue and white planter. I've dreamed of the gorgeous Blue & White Chinoiserie Planter from Ballard Designs forever, but at $200 a piece, I'm not that anxious to jump on it. However, at Goodwill last week, I stumbled onto three ceramic planters in the perfect hues...and for the perfect price! Check out my fun finds below.

China Cabinet Styling Ideas

This post for China Cabinet Styling Ideas contains affiliate links. I make a small percentage when these links are used, at no additional cost to you

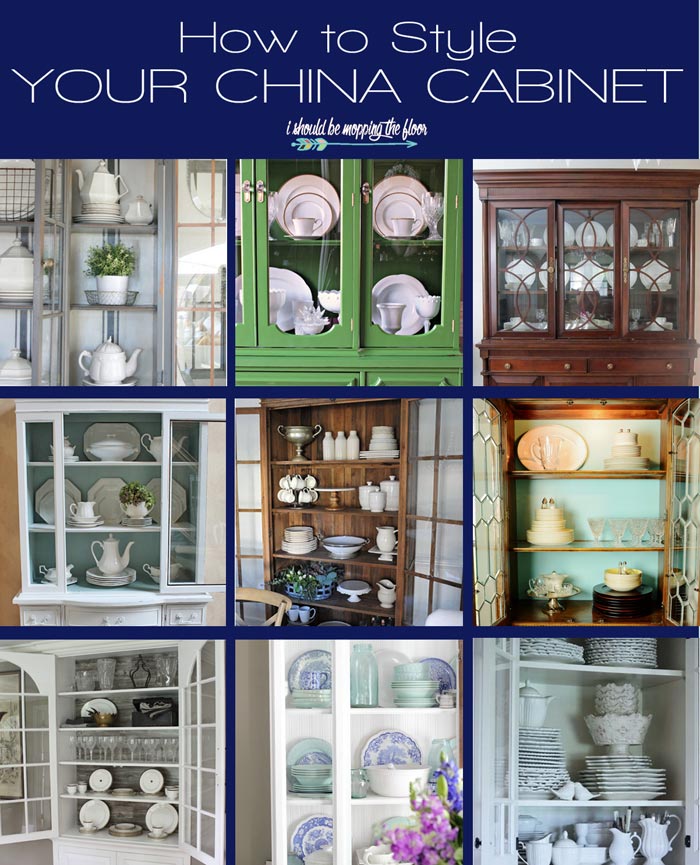
I've been working on some china cabinet styling ideas in my own dining room and thought I would share them here, too. From traditional, to modern, there are endless possibilities for displaying dishes and serving ware. 

How to Style Your China Cabinet
One of the rooms I've been piddling in lately is our dining room. We're having guests over this weekend...since we've officially been moved in for over two months, I thought it was way past time to load the dishes in my china cabinets. Having guests is a fabulous excuse to get things done, right?

Dining Room Makeover {On a Budget}

 
My six-month dining room makeover was complete two days after Thanksgiving. 
Oh the irony.

It was still very usable and worked out great for Turkey Day...I just happened to stumble onto the six most delicious Craigslist chairs the Saturday following the "big" day {and by stumbled onto, I mean I've been stalking four separate Craigslist city lists for them for the entiresix months}. Their purchase brought the never-ending dining room makeover to a close and within budget thanks to my good money management. Amen and hallelujah.

And truthfully, the dining room wasn't even on my makeover list for this year...it sort of just "happened". You may remember the saga from June...

"If you give Kristi new floors, she'll want to paint the walls before they're installed. And if she decides to paint the walls, she'll want to paint stripes. And if she's repainting the walls with stripes, she'll want to redo the window treatments. And if she's redoing the window treatments, she'll want to paint the backs of the hutches blue to match the new window treatments. . ."

I've said it before, but the previous decor was quickly turning into Sunday dinner at Grandma's. And I am more of a Saturday Night Supper Club kind of gal {at least that's how I picture myself in my mind...I suppose technically more of an on-the-couch-sweatpants-wearin'-watching-Downton-Abbey-with-a-diet-soda-in-one-hand-and-laptop-in-the-other kind of gal. Potato-PotAHto}.


I didn't think too much of my old dining room until an older lady from church {and I mean older with all due respect} came by one day. She told me my dining room reminded her of her mother's current dining room...at the nursing home. I about died, y'all. 


So when I realized we were getting the new floors, I turned to David and told him I was going to take on redoing the dining room while we were in the process of redoing the floors. Seemed easy enough. {Insert eyeroll}


Looking back, I'm quite thrilled I was dumb enough to take on the project in the midst of the craziness of installing new floors. My stupidity resulted in something I'm actually kind of proud of. 

Buh-bye, nursing home decor.


I've done tutorials and posts over several of the projects in here over the past few months. Here's the breakdown {click on the links to see the full posts}:

The green took quite a bit of primer and paint to get rid of. The beauty of getting the new flooring was skipping the drop cloth ritual. Liberating.


Again, I have a tutorial on how we created the flawless stripes in here.
We did them on the two shorter walls to add more depth to a short & squatty room.


And next came the flooring installation. Oh, sweet Jesus, this was a crazy day.


But soooooo worth it.
Nothing like a nice new palette to work with.


These were inspired by Allison from The House of Hepworths.
These ended up being a necessity after I realized how heavy the drapes were. Gah.


Which also created a lovely blue floor in my garage. 
Funny how drop cloths don't actually absorb paint.


Blue garage floor=fun and funky custom drapes


The Nester inspired me to make my own DIY Starburst Mirror out of posterboard.


Then I poked around in my parents' shed and found a dilly of a project:
my great grandmother's dresser. 


I also pulled off the backs of the china cabinets and painted them with that Oops Blue as well. I painted the "wrong" side of them, so if I ever want to go back to the wood sides, I can just flip them back over.
These belonged to my late uncle, then to my mother, and about seven years ago, were passed on to me when my parents down-sized into their new home. My uncle did all of the leaded glass in the doors himself.


I truly wanted a new drum-shade chandelier in here...but at $500+, it just wasn't in my budget.
Maybe one day...

For now, I bought some sparkly beaded garland, in my favorite shade of blue, on our Salado trip and simply wrapped pieces of the garland on each arm of the chandelier, as well as one strand at the top.


It just adds some extra bling-a-ding-ding up there.


And of course, the night before Thanksgiving, I put together some centerpiece candles to use for our meal...which I'm really pleased with how they came out.
They started out as Dollar Tree candle holders! To see that tutorial, click here.


And the final touch....THE CHAIRS!

I've seriously been looking for Parsons' Style chairs for quite some time for this room. I wanted some that didn't have host/hostess chairs, so I could keep them just on the sides of the table. The table also belonged to my late uncle...and I LOVE the big chunky base legs it sits on. I wanted to nix those end chairs to show off her pretty legs. And I'm completely flabbergasted that I stumbled onto the perfect chairs on Craigslist. What a find! The previous owner was getting rid of them for a few minor reasons {nothing wrong with them...just not right for her home}. I was only too happy to take these off her hands for a bargain.  


I couldn't be happier with the new space. While I know the floors were a huge part of this makeover, we received those at no monetary cost to us. Which brought this makeover to less than $400 for everything...I was kind of excited about that one! Had I bought those chairs new, they would have been over $1,000 {I had been contemplating that purchase for the whole six months}. So happy I waited!!


Gussied Up Dollar Store Candle Holders


I put together a very easy, inexpensive and super sparkly centerpiece that will take my dining table from Thanksgiving all the way through the new year.

I bought a floppity-jillion plain glass candle holders from Dollar Tree {as in $1 each}
....maybe closer to a dozen.
The most difficult part of this was removing the stickers on the bottoms. I soaked them in window cleaner and scraped them off with a kitchen scraper.

I did two versions of these...one with double stick tape and the other with the craft glue pictured above. The double stick tape ones were great...until after burning the candles for a few hours, the tape was so hot that it started to bubble and peel off a bit. So I HIGHLY recommend the glue route. 

I used a foam brush to apply a one-inch border to the tops of the glasses.

Then I coated them in glitter. I gave them a good shake and brush off once they were dry.

 
And there you go.
They were so sparkly and pretty during Thanksgiving dinner.

Now that Thanksgiving is over, I'm going to remove the pumpkins and replace them with silver ornaments up and down the runner...I can't wait to see how the light bounces off of the ornaments and glitter and candle glow. Cha-cha-cha.

I kind of liked how the glitter trails down the glass, even away from the glue.

This was our Thanksgiving set-up...with the kiddie table in front.
Hope all of you are enjoying this wonderful time of the year!

{i linky-party here}

DIY Starburst Mirror {from posterboard}

A starburst mirror made from posterboard? WHA?!? It's true, my friends.

Let me start out by saying that I can in no way take credit for being the creative genius behind this project. As most of you know, The Nester is the orignator of the posterboard Starburst mirror. I have put my own spin on it with my tutorial below. But, you can also find her tutorial here.

I'm really happy I ran across her tutorial...this was a quick & easy project with fantastic results. I love it when things come together like that.

Her mirror used a convex mirror in the middle...but, I couldn't find anything like that in the size I was needing. So, I made my own mirror...which actually shaved a lot of the cost off of this project. I picked up everything at HobLob. I found the unfinished wooden circle {with already-routed edge} for $1.99, the package of mirrors {it came with two} for $2.99 {and used my 40% coupon on that item} and my five pieces of posterboard {only used four of them} for $.39 each. If you're keeping track, I spent a total of $5.73 {pre-tax} out-of-pocket. That's pretty CRAZY {in a good way} if you ask me!

Other items that I needed {but already had}: hot glue gun/glue sticks, paint for the wooden circle, scissors and a little alligator-tooth clip thingy to hang this off of {or you can use a soda tab, like I keep seeing on Pinterest}.

I started by using my {in}famous "oops" blue paint {that's also used on my dining room drapes as well as that dresser that's in my dining room....oh, and my kitchen island}.

Just like the Nester, I used a paper towel to make a template. It's about a foot long...but the length didn't matter...I only used the pointy part. The length was dictated by the width of my posterboards.

My particular width ended up being the size it was since it fit the back of that wooden piece {as pictured in the photo above this one}. I started by laying it out on my first poster board...I used it as the template to cut my strips. I messed up one piece of board because I folded it in half to try to make it easier...this just made it worse. It's hard to put into words {that make sense outside of my head}, but trust me. It didn't work.

 To show you how it ended up shaking out, I created this little diagram that is to scale of a posterboard {standard size of 22"x28"} of how I cut each one. I got five strips out of each board. Before starting this project, I read through all the 172 comments the Nester got on this project...and I was a little amazed that one commenter had made this and needed twelve sheets of posterboard. I'm sure it turned out beautifully and is an incredible masterpiece...but I stuck with the four pieces recommended by the Nester.

The strips...ready for their points. 

Fold each piece in half the long way. And...because I'm totally OCD, I used the handle of my scissors to apply pressure for an even smoother crease. The crease also adds tons of dimension to the final piece, so this is an important step.

--
I have a really long, boring story of how I lost a lot of friends in college due to my OCD folding requests. I about went postal on my event-planning committee for our club when they didn't use their scissor handles to make perfect creases {which was clearly explained to them at invitation-folding orientation...helloooooo} in the 200 invitations we were putting together. It's like I'm totally unreasonable or something. {Okay, maybe a little, but I digress}. If any club sisters are reading this, please don't hate me for my OCD tendencies. It was all for the love of beautifully folded invitations.

Yeah. They were tri-folds, too. Ouch. 
--

Using the paper towel made previously {pictured several photos above}, fold it around the strips to cut your point. You can line the bottom flat edge of it up with the bottom edge of your strip. Then cut around the point. To be honest, I got a little annoyed with myself because I kept cutting into the paper towel {it was hard to avoid}...so I ended up using an already-cut pointed strip for my template from about the third strip on.

In total, I cut 24 strips {that's how many I counted on the Nester's project}...and that's how many are pictured above. However, once I started gluing, I only used 20 of the 24. So I had four {from one of the longest sections} left over. Not sure where I missed four...maybe my final project {or maybe my mirror} was smaller than hers? It truly didn't matter in the end. As you can see from the above pic {that I went a little overboard on with verbage}, two of the sets are slightly smaller than the others. I just sort of eye-balled this short-cutting part. Reaaaaal technical.

{I'm such an oxymoron sometimes: I go to great lengths for perfect creases but eye ball cuts? Weird.}

I started with my shorty strips {since they go on first}. I originally just did a bead of glue along the bottom...but then went back and filled in that whole area you see with glue. Since these are the base points, most of the other boards will be glued to these....so these need to stick. Really well.

Work in groups of four. And feel free to draw compass-like lines on the back of your board-circle-thing to make sure it all lines up. You'll put them down in a compass-like layout.

These were the first four. After getting these on, it all went pretty fast. Just rotate to the next set of "compass lines" to glue the next set. After a few sets were on, I just started eyeballing {again}.

These are all of the strips glued onto the board {and to each other}. You can see the little hanging clip that I added before gluing all the strips down. Feel free to use a soda can tab if you don't have one of these hangers on hand. You can also see The Nester's post there on my computer! :)

After getting all of the strips glued on, I flipped it over and hot glued the mirror on the front {I just used one, but two actually come in the packages....if this one ever falls off and breaks, please remind me that I put the spare in the top right drawer of that dresser there. Please and thank you.}

And there you have it. I may have way over-complicated a rather simple project...but as I mentioned above, I'm OCD {and super type A}. Over-complicating is the only way I know how to do things. But, thanks for loving me anyway.

 YAY!