i should be mopping the floor: fabric
Homepage Projects and Crafts Free Fonts Free Printables and SVG Files Printables Journals and Planners Facebook Covers and Device Wallpapers Fall Projects and Printables


Showing posts with label fabric. Show all posts

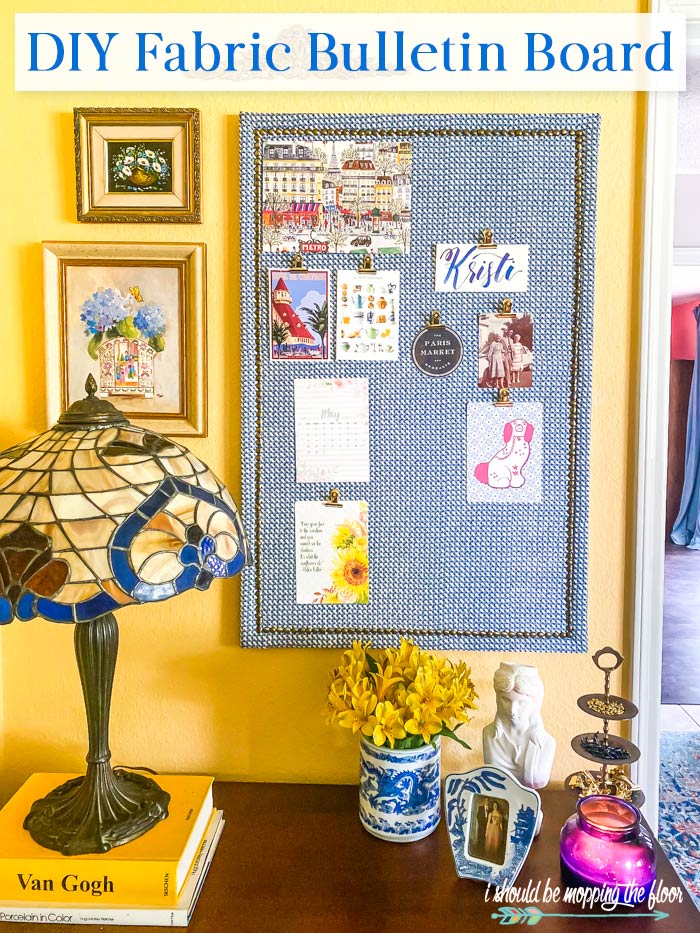
DIY Bulletin Board with Nailhead Trim

This post for a DIY Bulletin Board contains affiliate links. I make a small portion when these links are used, at no additional cost to you.

I'm really enjoying this new DIY Bulletin Board I added to my office. My previous ones were a lot smaller and had stuff hanging over the edges. Plus, the fabric on this one really makes me happy and kind of completes this little corner. This new piece was also super budget-friendly. See how to make your own DIY Bulletin Board below.

DIY Bulletin Board
I'm not sure other adults are as enamored as I am with having a bulletin board, but I've always enjoyed keeping one. While it's probably more of a kid thing, I still love visually seeing special keepsakes, reminders, calendars, and printables on a regular basis. See how I put this new one together below.

Blind Hem Stitch Tutorial

This Blind Hem Stitch Tutorial is brought to you by Laura Ashley USA. All opinions and designs are mine alone.

Are you familiar with a Blind Hem Stitch? It's a great one to use on draperies, pants, and slacks. This type of stitch is designed to be nearly invisible. It's simple to create on a home sewing machine, too. Check out my Blind Hem Stitch tutorial below.


Sewing a Blind Hem Stitch
Today, I'm sharing how to create a blind hem stitch on drapery panels. It's great to create that "hidden seam" at the bottle of your drapery panels. And it's also just a nice seam to know how to sew. Check out the Blind Hem Stitch Tutorial below.

Unicorn Hoop Art

This post for Unicorn Hoop Art contains affiliate links. I make a small portion when these links are used, at no additional cost to you.

Who doesn't love a glittery unicorn, y'all? This sweet little Unicorn Hoop Art project is perfect for kids and adults, alike. It combines a bit of embroidery (only one simple stitch) with fabric paint and a stencil. And of course, bonus points for using glittery fabric paint on your unicorn.

Whip up these Unicorn Hoop Art Pieces in No Time!
Where are my unicorn lovers out there? This sweet little project is so fun to put together...especially with the combination of fabric paint and embroidery. You can totally do one or the other...but combining the two really makes your unicorn POP! I also used an adhesive stencil to make the painting really simple. See how this glittery unicorn hoop art came together below.

Lined and Zippered Small Cosmetic Bag

This Small Cosmetic Bag tutorial contains affiliate links. I make a small portion when these links are used, at no additional cost to you.

I love lots of little bags to compartmentalize everything when I travel. This small cosmetic bag is actually my new go-to for all of my supplements and first aid items. It's the perfect size to slide into a carry-on bag or purse. Find out how to make your own little cosmetic bag below.
Easy Bag Tutorial


Earlier this fall, I shared a tutorial for my Boxed Toiletry Bag. I love that bag, but it gravitated more to make-up use, rather than supplements and such. I realized I prefer a smaller cosmetic bag for organizing supplements, bandages, and other related items. I like to have these in my carry-on with me and the boxed bag was a bit large for that. This new lined and zippered small cosmetic bag fits the bill perfectly. It can slide right into my tote, so I can have easy access during a flight. This bag has more structure than a typical cosmetic bag, too, which is something I prefer. Check out its tutorial below.

DIY Scrap Fabric Bunting

This post for a DIY Frayed Fabric Bunting contains affiliate links. I make a small portion when these links are used, at no additional cost to you. 

This DIY Frayed Fabric Bunting is an easy way to add a touch of color, loads of texture, and vintage fun to any room or even party space! Plus it's a super simple craft that anyone can do. 

DIY Scrap Fabric Bunting
I originally posted this as a guest post on a blogger friend's site a year ago or so. However, whenever I host a party at the house or post a pic of this thing on Instagram, people ask how I made it. I thought it would be fun to include the tutorial (with some newer pics, too) over here for reference. 

I’m over the moon in love with the whole bunting concept. It all started in college when my roommate’s mom made her some cute frayed fabric bunting for her window. She taught us a simple to trick to make it all vintage-y and fun…and frayed! Check out the tutorial below>>>

{Super Cheap} DIY T-Shirt Scrap Wreath for Halloween


I'm not a huge Halloween person. I basically decorate for fall without being holiday specific...so it can take me right through Thanksgiving. However, this year, I thought it might be fun to create an actual Halloween wreath. Since I'm not that into this holiday, I didn't want to spend too much on this wreath...so t-shirt scraps it was!

I found several t-shirt wreaths on Pinterest, but ended up kind of doing my own thing on this one. I didn't want a floppy wreath...I wanted it full and fluffy. I did also use about a yard of fabric that was leftover from last year {not sure why I bought it...but it's been in the scrap pile for a long time}. I used it to tie all of the colors together and add one other texture to the wreath. I also used the mesh for a bow {I already had it on hand...I buy it when it's on sale and use it for gift wrapping}. I purchased the "BOO" pick and pulled out the wire {it was 1/2 off at HobLob, making it $1}. I also purchased the wreath form {it was $2.99 at HobLob and I used my 40% coupon on it}. So, my total out-of-pocket cost was less than $3 for the whole thing! Woohoo!

I noticed others who've made a similar wreath purchased their t-shirts from thrift stores or other places. With my husband being a principal and the fact that I used to be a graphic designer at an actual t-shirt printing shop, we literally have bajillions of t-shirts on hand {it's not normal, I tell you}.

I basically used all of the parts of the shirt that I could, excluding anything with print on it.

This is roughly the size of strips that I cut out to use on the wreath.  

I used three t-shirts {one black, one orange and one purple} and the additional yard of fabric, like I mentioned above. It took a couple of hours to cut my strips...and I used pinking shears for all of them {I have a thing for texture}.

Then I just started tying the scraps onto the wreath...pulling all of their "tails" to the front of the wreath. I also alternated the colors of my scraps. It took a little over an hour of tying to get all of the scraps on there.

This is what the back of the wreath looks like when finished {the numbers and horribly illustrated lines showing you the different wire rungs}. The outer wire rung of the wreath {which I was originally going to leave empty since it didn't show} was filled in with only fabric scraps...just so I could get a lot of the fabric showing. I used every bit of fabric/t-shirts...which is why the outer wire was slightly skimpy. But, that doesn't show from the front at all.

I pulled a length of the wire mesh through the wreath wire rungs and tied a bow on the front. I hot glued the "BOO" onto the bow.

I was really pleased with how fluffy the wreath turned out. I think the addition of the fabric, along with the shorter length of my strips, helped this not to be overly-floppy like scrap wreaths can be. I loved this method so much that I'll probably do a Christmas wreath like it, too {still pulling from our endless supply of t-shirts}.

Now I finally have actual Halloween decor, instead of my usual "fallish" stuff!


Painting Upholstered Furniture

 The Before & After
{yep, it is the same chair}

This past weekend, I was able to head up to the Dallas area and spend some time with the bestie {Pictured above is us through the years}. Lori & I have known each other since our freshman year at college...and have WAY too many stories on each other! It's always such a blast to hang out with her. She's expecting her third baby at the end of August and we spent part of our weekend working on a WAY FUN project for Miss Lola's nursery. 

This is where we began. Nine years ago, this chair entered Lori's life for baby #1. A couple of kiddos {and a crazy red Sharpie incident} later, this chair could use a little TLC. But we weren't giving up on her.

Fabric Wreath Tutorial

Photobucket

I can't take any credit for the brains behind this one. Celeste over at My Greenbrae Cottage posted a tutorial for her fabric Valentine's wreath....and I was hooked! I didn't see her tutorial until a week before Valentine's, so I decided to do something a bit more neutral that could take my front door well into spring time.

Supplies:
- 2.5 yards of fabric
- a really good pair of pinking shears
- 15" styrofoam wreath
- hot glue gun & glue sticks
- knitting needle (get ready to laugh at me....I'm not a knitter, so I used my old meat thermometer that quit working a while back. Don't worry, I have a new one that I use for the meat!)

Photobucket

You'll start with five coordinating (or not...I won't judge you) fabrics in a half a yard each. I cut every bit of my fabric into 4"x 4" squares. I'm not a fast project person...this took me a couple of evenings while catching up on my DVR to get them all cut out. You can make a template with an index card and wrap fabric around it to cut a bunch of squares all at once....this really sped up the process.


Photobucket
Use the point of your knitting needle (or meat thermometer, thankyouverymuch) and wrap your square around the sharp pointy end (I'm super technical, I know). Don't poke through the fabric. Stick a dab of hot glue on the fabric point and stab it into the styrofoam...go about 1/4 inch deep.


Photobucket
Start working your way around the wreath. It fills in pretty fast, actually. Don't forget to cover the inside & outside, too. I did leave the back fabric-free so it would lay flat on my door (I always keep my wreaths between my door & storm door to make them last a tiny bit longer). Texas gets windy and I don't want any decor blowing down the street!


Photobucket

Once you're finished, loop your favorite ribbon through the wreath to hang it by. I used brown tulle because I'm on a brown tulle kick. I think some 3" satin ribbon would be really lovely, too! I can't wait to make one of these for Christmas time...I have my eye on some red & white polka dot fabric and kelly-green damask. This is just such a personalized project that will look different for everyone depending on your fabrics. I think it would be darling in a nursery using coordinating bedding fabric. The possibilities are endless!

Happy Wreath-Making!
Linking up to the parties in my sidebar.