


This DIY Interchangeable Wreath shop has been compensated by Collective Bias, Inc. and its advertiser. All opinions are mine alone. #EverydayCraftMoments #CollectiveBias
While the holidays are somewhat the official "wreath season", I like to keep something festive on the door year-round. I created this DIY Interchangeable Wreath as a budget-friendly way to display something pretty on the front door all year long, with just a quick change between seasons.

 Pictured above, on my front porch, is the fall version of this DIY Interchangeable Wreath. It's perfect for another week. After that, I can't wait to use the Christmas one...and get out all of my decor!
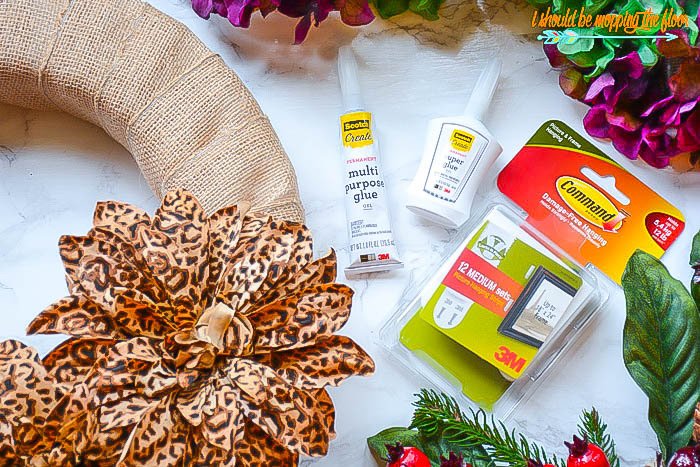 I used some of my favorite Scotch™ Brand products to create this DIY Interchangeable Wreath (you can hover and click on the above photo to purchase these products). Scotch™ Brand enables me to create projects I am super proud of...I also trust their durability. The Scotch® Create Multipurpose Glue was awesome for the ribbon base on the wreath...it's permanent, too. The Scotch® Create Super Glue was used to adhere the floral pieces to their bases. And the Command™ Picture Hanging Strips are a great tool to attach new pieces on and off of the wreath from season to season.
 Although I didn't use it on my wreath, I did grab the new Scotch® Wall-Safe Tape on my craft supply run. It's awesome for hanging holiday cards on door frames (which is pretty old-school, but still a fun way to display them!). You can find most of these items in the paper craft aisle at your local Walmart. Scotch® Create Adhesives...there's masking tape, spray adhesives, and everything in between. No matter what the task, there’s a Scotch® Brand product to match.
In addition to all of the Scotch® Create Adhesives I used on my DIY Interchangeable Wreath, I also grabbed a variety of florals to use. I tried to get something a bit evergreen that I could use year round, something fallish (I love leopard print for fall!), and then (pictured below) some holiday florals, too.
 I ended up grabbing a few too many holiday florals...I just couldn't help myself. I used about half of this on the Christmas part of this wreath. I have no doubt I will be able to use the rest, though.
 You will also need a styrofoam wreath form (in your desired size) for your wreath. I cut up a cardboard box, too, for my wreath's seasonal pieces. The different swags I placed on the wreath are each adhered to these cardboard pieces (I told you this was budget-friendly!). I liked my swags on the bottom of the wreath, but you could also do them on the side or top. I simply traced the portion of my wreath form that I wanted the seasonal goodies on to the cardboard. Then I used a craft knife to cut out the shape. Since the Christmas one was a bit heavier, I cut two pieces out and glued them together with the Scotch® Create Super Glue to make that piece a bit sturdier.
 I used a neutral burlap ribbon to wrap my wreath. I dotted the wreath with Scotch® Create Multipurpose Glue as I wrapped to secure the ribbon. This stuff was perfect to work with...hot glue always melts through styrofoam, so this worked beautifully. You can also add in a floral pin at the beginning and end of the ribbon if you're nervous about it staying in place. Those can be helpful to have in place as the glue dries.
 I also wrapped and glued all of my cardboard pieces so they blended with the wreath.
 I trimmed all of the stems off of the floral pieces with floral wire cutters. Then I used the Scotch® Create Super Glue to adhere the florals to the covered cardboard. I let them dry completely before handling them.
 I did each one a bit different...this is the part where it's fun to get creative. The hydrangeas will be nice for year round decor since they're so versatile. I do like to have seasonal-specific wreaths for fall and Christmas, though. For the holiday piece above, I cut small pieces off of the florals I bought and just kept layering them on...letting the glue dry between layers.
 Once everything was completely dry, I used the Command™ Picture Hanging Strips to attach them to my wreath. These are perfect since you can pull the seasonal pieces on and off the wreath without hassle. The beauty of this DIY Interchangeable Wreath is that you can create as many pieces as you like...a birthday wreath would be so fun, too! There are so many possibilities with this one.
 I tied the wreaths to the hanger on my door with strips of colored burlap.


I'm a bit of a wreath junkie...but let's face it, they get spendy. And if you make your wreaths yourself, it can be a lot of work to create a new one for every season. Having a DIY Interchangeable Wreath covers a multitude of wreath issues: it's super budget-friendly, not as much work, and storage wise, it can't be beat. See how simple it is to create one of these for yourself below.
Although I didn't use it on my wreath, I did grab the new Scotch® Wall-Safe Tape on my craft supply run. It's awesome for hanging holiday cards on door frames (which is pretty old-school, but still a fun way to display them!). You can find most of these items in the paper craft aisle at your local Walmart. Scotch® Create Adhesives...there's masking tape, spray adhesives, and everything in between. No matter what the task, there’s a Scotch® Brand product to match.In addition to all of the Scotch® Create Adhesives I used on my DIY Interchangeable Wreath, I also grabbed a variety of florals to use. I tried to get something a bit evergreen that I could use year round, something fallish (I love leopard print for fall!), and then (pictured below) some holiday florals, too.
Would you enjoy a DIY Interchangeable Wreath on your door?
When you're armed with Scotch™ Brand, you’ve got the craft thing covered. Create something and make it your own: amazing, share-worthy, and beautiful! Be hands-on with Scotch™ Brand.

Neglect your chores like me and don't miss a thing:
What? Another fabulous idea? Yes!!
ReplyDeleteThis is the perfect way to always have something on your door without needing tons of storage room for wreaths! We've been slowly getting rid of things with the idea of moving into a smaller house. This would be a great idea to help!
ReplyDeleteWhat a wonderful way to change for the seasons Thank you for you sharing
ReplyDeleteGreat idea! This is why I have like three wreath boxes, lol!! Visiting from Best of the Weekend party.
ReplyDelete